
Seed art, sometimes called crop art or seed mosaics, is the traditional craft involving gluing seeds, beans, and lentils onto a surface to create pictures or patterns, and it’s one of those activities that perfect for seniors and anyone who loves the almost meditative state of making art using seeds.
It is simple, quiet, and easy to set up without spending much money.
You need just three things: glue, seeds, and something to stick them on. There’s no special technique to learn, no expensive materials to buy. It uses everyday bits you may already have in the cupboard.
Why Seed Art Works So Well
It’s Naturally Meditative The process of picking up seeds and placing them, one at a time, has a rhythm to it. There’s something soothing about the repetition, it occupies your hands and gives your mind something gentle to focus on without being demanding.
Sensory-Rich Without Being Overwhelming Seeds offer different textures, sizes, colours, and even subtle scents. Smooth lentils feel different from bumpy chickpeas. Black beans contrast with yellow split peas. Running your fingers through a bowl of seeds is satisfying in itself.
Mistakes Don’t Exist With seed art, there’s no such thing as putting a seed in the “wrong” place. If you don’t like where you put something, you can move it while the glue is wet, or just incorporate it into the design. Seeds placed randomly still create interesting patterns and textures.
It’s Accessible If someone has limited dexterity, use larger beans. If the attention span is short that day, do one small section and leave the rest for later. If drawing a design feels like too much, just make simple stripes, blocks of colour, or a loose pattern.
Seeds are inexpensive and available at any grocery store. You don’t need artistic ability, just the willingness to stick seeds onto glue. The craft scales beautifully from very simple (filling in a pre-drawn shape with one type of seed) to complex (creating detailed pictures with multiple seed types).
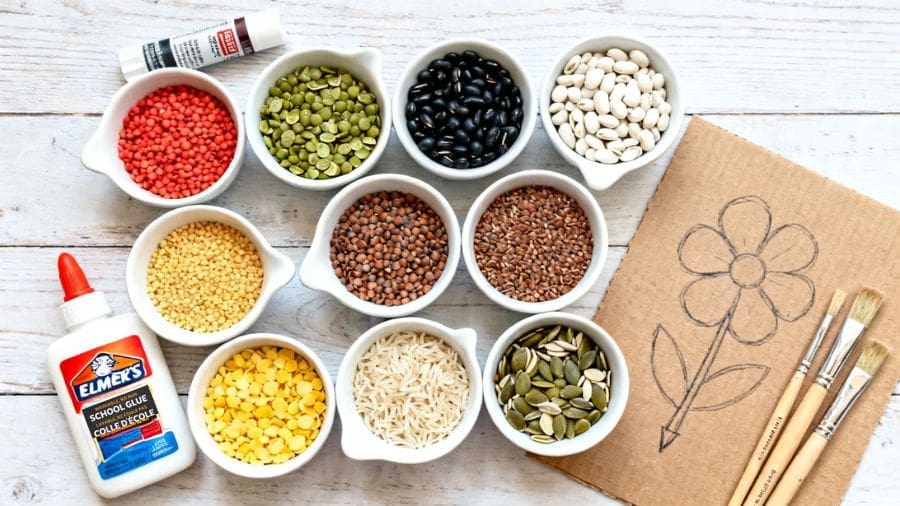
Materials You’ll Need
Base:
- Cardboard (cereal boxes work great)
- Wooden plaques or boards
- Canvas boards
- Sturdy paper or card stock
Adhesive:
- White glue (Elmer’s or similar)
- Glue sticks (easier for some people to control)
- Mod Podge (for sealing the finished piece)
Seeds and Legumes: Start with 3-5 varieties in different colours:
- Split peas (green, yellow)
- Lentils (red, orange, green, brown)
- Black beans
- White beans (navy or great northern)
- Rice (white, brown, wild)
- Popcorn kernels
- Sunflower seeds
- Pumpkin seeds
- Dried corn kernels
- Millet
- Quinoa (for fine detail or texture)
Other Supplies:
- Small bowls or containers for each seed type
- Pencil for sketching shapes
- Paper towels for wiping fingers
- Newspaper or plastic tablecloth to protect surfaces
You really do not need loads. I would start with just three or four seed types in different colours and sizes so it stays manageable.
Step-by-Step Instructions
Step 1: Prepare Your Workspace
I usually start by covering the table and putting each seed into its own little bowl. It just makes things easier to see and easier to reach. Having seeds sorted by colour helps, but it’s not essential.
If the person you are with enjoys sorting, you could even make that part of the activity. Separating beans from lentils, or putting different colours into different bowls, can be calming on its own.
Step 2: Choose A Simple Base
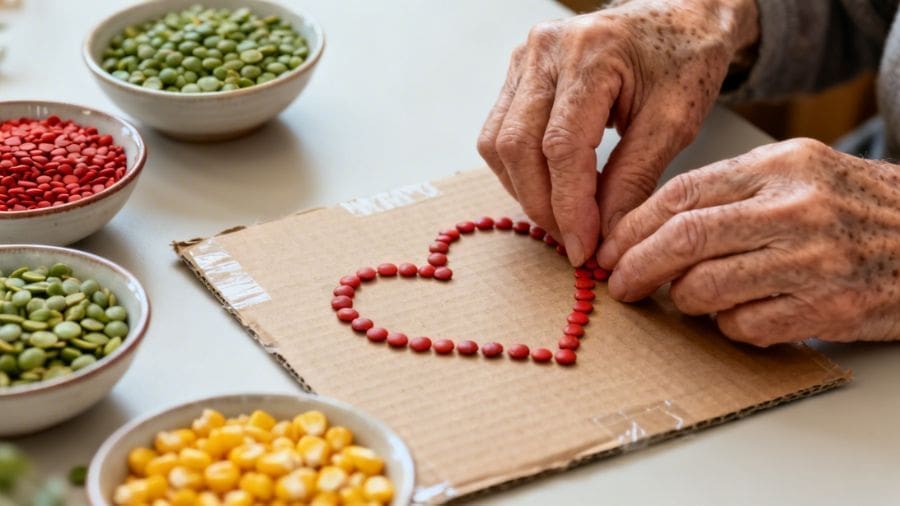
A bit of cardboard from a cereal box works absolutely fine for this or any other cardboard you have lying around. I draw a very simple shape first, something like a heart, flower, circle, or large leaf, just let the design happen as you go. Geometric shapes, or abstract patterns all work beautifully. Or skip drawing entirely and create a free-form design as you go.
With dementia friendly crafts, simpler is usually better. A big clear shape is easier than lots of little sections. You could also divide the card into broad strips and fill each strip with a different seed. That works well and still looks lovely when it is done.
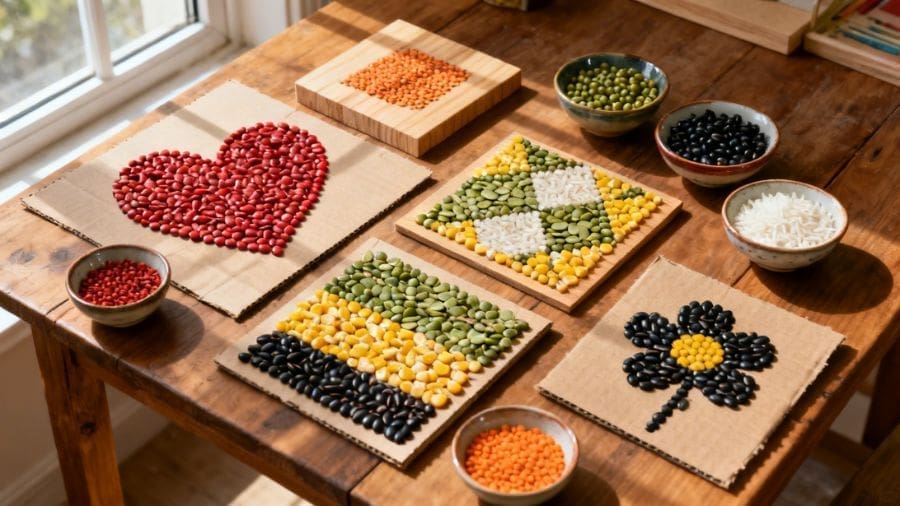
Simple design ideas:
- Fill the entire surface with stripes of different seeds
- Create a heart shape filled with red lentils
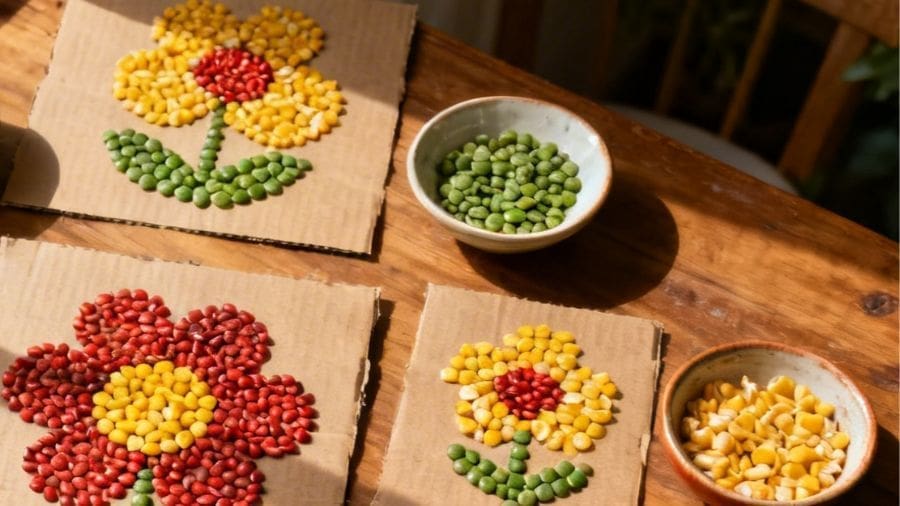
- Make a simple flower with petal and centre sections
- Divide the surface into sections and fill each with a different seed
- Create a sunset or landscape with horizontal bands of colour
Step 3: Apply Glue to One Section
This is one of the things I learned quickly. It is much easier to work in small patches than to spread glue over the whole card at once. If you cover too much area, it starts drying before you get to it, and then it just becomes annoying. Spread glue over one area, about the size of your palm or smaller.
A glue stick can be easier for some people to control because it is less messy, but white glue works well too.
Step 4: Start Placing Seeds
This is where the quiet rhythm of the craft starts. Pick up a seed, place it in the glue, press it lightly, then do the next one. Some people like to make neat rows. Some people prefer to scatter them more freely. Both ways work.
Press each seed down lightly so it sticks, but don’t worry about perfection. Seeds can overlap, leave gaps, or sit at angles—it all adds to the texture and character of the piece.
If finger grip is an issue, larger beans or pumpkin seeds can be easier than rice or quinoa. You can always save the tiny seeds for filling little gaps later, or skip them altogether.
Step 5: Continue Section by Section
Once you’ve filled your first glued area, move to the next section. Apply glue, add seeds, and keep going. You can switch seed types for different sections, create borders where colours meet, or let them blend together.
There’s something satisfying about watching the design grow gradually, section by section. A visible sense of progress can help keep interest going.
Step 6: Fill Gaps (Optional)
Sometimes you end up with little spaces where the card is still showing through. You can leave them if you like, or go back and fill them with smaller seeds like rice. Both are fine.
Step 7: Let It Dry Completely
Once the seed art is done, it needs time to dry. I would leave it flat somewhere safe and come back to it later or the next day. Trying to move it too quickly can shift everything around, which is a bit disheartening after all that careful placing.
Drying overnight is usually easiest.
Step 8: Seal Your Artwork (Optional)
If you want to keep it, display it, or give it as a gift, you can brush a thin layer of clear craft glue or Mod Podge over the top once it is dry. That helps hold the seeds in place.
If Something Goes Wrong
Seeds won’t stick: Add more glue. Some seeds are heavier or smoother and need extra adhesive.
Made a mistake: While the glue is wet, just pick the seed off and place a new one. Once dry, you can glue a new seed on top.
Glue dried before finishing a section: Just add more glue over the dried area and continue.
Running out of a colour: Switch to a different seed type and make it part of the design. Necessity often creates the best artistic choices.
Variations to Try
Pre-Drawn Templates
One version I really like is using a simple template. You can draw a big flower, heart, butterfly, or even the first letter of someone’s name, then fill it in with seeds. That gives enough structure to make the activity feel clear, without making it too demanding.
Colour Sorting Activity First
Before creating art, spend time sorting mixed seeds by colour or type into different containers. This is calming in itself and can be the entire activity some days, with the art-making happening another time.
Single-Seed Mosaics
Use just one type of seed but create patterns through placement—spirals, lines, or scattered arrangements. This simplifies decision-making while still creating beautiful results.
Textured Landscapes
Create simple landscapes using seeds to represent different elements: green lentils for grass, blue-painted rice for sky, brown beans for tree trunks, yellow corn for sun.
Seed Mandalas
Start with a circle drawn on your base and work from the centre outward, creating concentric rings with different seed types. The symmetry is satisfying, but perfection isn’t necessary.
Seasonal Themes
Another nice option is to make a seasonal picture. Autumn leaves with red lentils and yellow split peas work beautifully. Spring flowers can be done with pale beans, rice, and green lentils. These little touches can help the craft feel more connected to the time of year.
Frame Within a Frame
Glue seeds around the border of your base first, creating a natural frame, then fill the centre with a different design or seed type.
Simple Shapes in Contrast
Fill your base with one seed colour as background, then create simple shapes (circles, squares, hearts) in a contrasting seed colour on top. Or If you want something even simpler, just make stripes or blocks of colour with different seeds. That still gives the same sensory and calming benefits without asking for much planning.
Tips for Success
Start small: I would keep the first piece small. A postcard sized bit of card is plenty to begin with. Bigger projects can feel like too much.
Use bigger seeds for easier handling: I would also choose larger seeds first if dexterity is limited. Big beans are much easier to handle than tiny grains.
Work on a flat surface: This prevents seeds from rolling away and makes it easier to see what you’re creating.
Take breaks: Seed art is forgiving, you can stop mid-project and come back later without any problem.
Keep it simple: A basic design filled with one or two types of seeds can be just as beautiful as a complex picture.
And I would keep the focus on the doing, not the finished result. That was always the most useful approach for me. If the person placed ten seeds and enjoyed those ten seeds, then the craft did what it needed to do.
When You’re Finished
Once dry, the finished seed art can be propped on a shelf, stuck on the fridge, or given to family as a handmade gift. It has a lovely natural look to it, and even very simple pieces can turn out well because of the mix of colour and texture.
There’s something special about giving someone art made with natural materials and time.
The wonderful thing about seed art is that it meets you where you are. Some days you might create detailed pictures; other days, simply filling a shape with one colour of seeds is enough. Both are valuable. Both create something beautiful from the simple act of placing one seed after another.