
I used to make these simple Valentine heart craft decorations with my Mum because she loved sewing. I realised most Valentine crafts involve either tiny fiddly bits, hot glue guns that burn fingers, or complicated folding that leaves everyone frustrated. This one uses felt squares, basic stitching, and stuffing, no fiddly bits!
The lovely thing about this Valentine heart sewing craft is that it creates something genuinely pretty you can hang around the house or give as gifts, and the whole process takes about twenty minutes per heart, which is a good length for maintaining attention without rushing anyone.
This post may contain affiliate links. If you buy through them, I may earn a small commission at no extra cost to you. See our Privacy Policy for details.

You’ll Need
**Product links included**
- Felt squares in reds, pinks, or white (the stiffer craft felt from pound shops works beautifully)
- Embroidery thread in contrasting colours
- Large blunt tapestry needles (the kind with big eyes)
- Cotton wool or toy stuffing
- Scissors
- A heart template printed or drawn on card (roughly 10cm across works well)
- Fabric Marking Pencil
- Small ribbon scraps for hanging (optional)
I kept a little basket with these sewing supplies ready to go, you probably have something similar at home that you can use too.
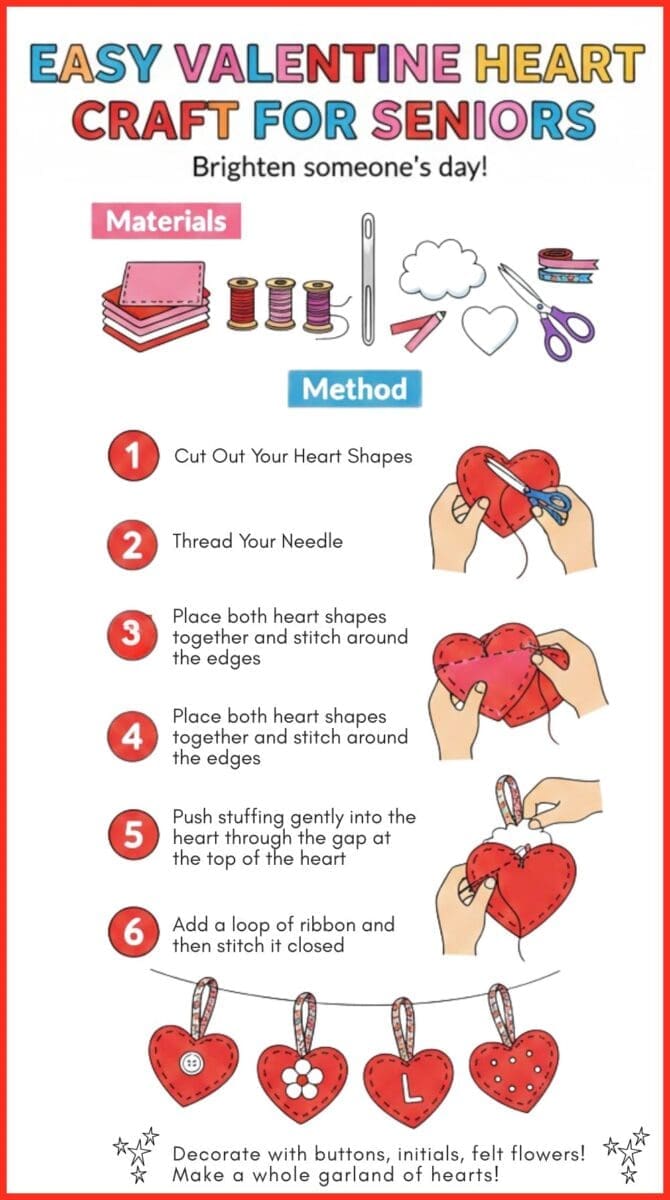
Step 1: Cut Out Your Heart Shapes
Put the card template on the felt square and trace round it with a pencil, then cut out two identical hearts for each finished decoration. The felt is forgiving, so wobbly edges really don’t matter and actually add a handmade charm.
If seniors struggles with scissors, you can pre-cut the hearts yourself or they can tear felt pieces for a more abstract heart-ish shape that still works. I’ve also folded the felt in half and cut both hearts at once, which speeds things up but needs a steadier hand.
Step 2: Thread Your Needle
I cut about 50cm of embroidery thread, which sounds long but gives enough to work with without constantly rethreading. You can use all six strands for a chunky visible stitch or separate it down to three strands for something neater, though I usually stick with the full thickness because it’s easier to grip and shows up nicely.
Threading the tapestry needle is straightforward with the large eye, but I sometimes lick the thread end to stiffen it or cut it at a sharp angle if someone’s eyesight isn’t brilliant. Tying a knot at the end prevents the thread pulling straight through when you start stitching.
Step 3: Start Stitching Around the Edge
I place both heart shapes together and push the needle up from the bottom about 5mm from the edge, pulling until the knot catches. Then make simple running stitches all the way around, keeping them roughly the same distance from the edge and the same distance apart.
Honestly, I’m not fussy about stitch type. Running stitch works, blanket stitch looks lovely if someone knows it, and even a random in-and-out approach holds the heart together just fine. The rhythm of stitching is what people seem to enjoy, and I’ve sat in companionable silence doing this while listening to the radio.
For people with dementia or arthritis, the blunt tapestry needle is safer than a sharp one and the felt is soft enough to push through without much force. If gripping is difficult, you can get needle threaders with handles or even those automatic needle threaders from sewing shops.
Step 4: Stop Before You Close It Completely
When you’ve stitched about three quarters of the way round the heart, stop with your needle still in the fabric. This bit is important because you need that gap to add the stuffing.
Stitch up both curved top parts of the heart and down one side, leaving the bottom point area open. It doesn’t matter exactly where you leave the gap as long as it’s big enough to poke stuffing through.
Step 5: Add the Stuffing
I pull off small bits of cotton wool or toy stuffing and push them gently into the heart through the gap, using the blunt end of a pencil or my finger to poke it into the top curves. You want it pleasantly plump but not rock hard.
This is quite a satisfying sensory bit. The transformation from flat felt to a puffy three dimensional heart happens right in your hands. I’ve found people really like this stage, and some want to add loads of stuffing while others prefer a flatter heart, which is absolutely fine.
If you’re using cotton wool balls from the bathroom cabinet rather than proper toy stuffing, pull them apart first so you don’t get lumps. The stuffing doesn’t need to be even, just enough to give the heart some body.
Step 6: Stitch It Closed
Once you’re happy with the plumpness, continue your stitching to close up the gap. When you reach where you started, push the needle through to the back, tie a knot close to the felt, and snip the thread.
I sometimes add a loop of ribbon before I close it completely if I want to hang the heart. Just fold a 15cm piece of ribbon in half, poke the loop ends into the gap at the top centre of the heart, and stitch over them as you close it up. The ribbon gets caught in the stitching and creates a hanging loop.
Step 7: Finishing Touches
This is where you can stop, and you’ll have a lovely padded heart, or you can add buttons, sequins, or embroidered initials if someone’s keen to keep going. I’ve stuck little felt flowers on with fabric glue, sewn on seed beads (though these are fiddly), and embroidered names across the front.
You can make three or four hearts in a row. I keep any half-finished ones in a fabric bag and we come back to them another day, which works fine because felt doesn’t fray or crease.
If Something Goes Wrong
- The most common issue I see is thread tangling, which happens when you pull it through too enthusiastically or don’t let it hang loose occasionally to untwist. If it knots, just work the knot loose gently or snip it and start with fresh thread. Nobody will see the join inside the stitching.
- If the stitches are wildly different sizes or wandering all over the place, it genuinely doesn’t affect how the heart works or looks from a distance. I’ve made hearts where the stitching is practically abstract art and they still look cheerful hanging on a door handle.
- Overstuffing can make it hard to close the gap, so if that happens, just pull a bit of stuffing out. Understuffing makes a floppy heart, which some people actually prefer because it’s lighter to hang and has a more vintage raggedy look.
- If someone pricks their finger with the needle (even blunt ones can jab occasionally), we just take a break. I keep plasters in my craft box for this reason, though it rarely happens with the tapestry needles.
Try These Variations
- Instead of stuffing the hearts, you can fill them with dried lavender for a scented sachet. I put the lavender in a little muslin bag first before stuffing it inside, which stops the dried bits poking through the stitching and falling out.
- You can also make these hearts from two different coloured felts, one for each side, which looks quite modern and lets you use up scraps. I’ve done red on one side and pink on the other, or white with red.
- For a completely different approach, skip the stitching entirely and use fabric glue to stick the edges together (leaving a gap for stuffing), then seal it with glue after stuffing. This works well if needles and thread are too frustrating on a particular day, though I do think the stitching is where most of the mindfulness, focused activity comes from.
- If you want something more decorative, cut small shapes like stars or flowers from contrasting felt and glue or stitch them onto the heart before you join the two sides together. I’ve also used fabric paint to add dots and swirls, though you need to let that dry completely before assembling.
- Some people like making tiny hearts, about 5cm across, which use less materials and work up quickly. Others prefer bigger ones that fill your palm.
Making This Craft More Accessible
Not everyone will be able to hand sew, and that’s fine, but you can see from the above instructions I’ve tried to make the craft as accessible as possible, you can do the same by using.
- Pre-thread needles
- Use blunt embroidery needles
- Switch to larger stitches
- Offer fabric glue for closing instead of sewing
- Create sachets together, with one person sewing and another filling
I hope these small steps help to make this an enjoyable craft for all.
Keeping the Hearts After Valentine’s
We’ve hung finished hearts on door handles, strung several together on ribbon to make bunting, propped them on shelves, and tucked them into cards as three dimensional decorations. I used one to sew on to a fidget blanket. You can give them away as gifts to friends, it’s lovely to spot them hanging in their home.
I’ve also used them as gift tags by making them quite small and stitching someone’s initial on the front, then attaching them to wrapped presents. They’re much nicer than paper tags and the recipient can keep them.
The fabric hearts last for years if you store them in a box rather than a plastic bag (which can make them smell musty).
You could absolutely make these hearts in other colours for different occasions too. Green ones for spring, autumnal orange and brown ones, even blue and white for winter. The technique stays exactly the same, just the felt colour changes, so once you’ve made Valentine hearts you’ve essentially learned a year round decoration craft.
This is one of those rare projects that actually gets finished in one sitting, creates something that looks good rather than like a primary school attempt, and doesn’t require any special skills or perfect motor control. This Valentine heart sewing craft works, seniors enjoy it, and you end up with cheerful little hearts that make you smile.