
Mother’s Day is just around the corner, and there’s something special about giving a gift you’ve made with your own hands to the mothers in your life, whether that’s your daughter, granddaughter, daughter-in-law, or a special friend. Store-bought presents are nice, but handmade gifts carry a warmth and thoughtfulness that can’t be purchased.
If you’re looking to make something meaningful for the mothers you love then why not try one of these five crafts.
Each of these crafts offers different benefits: some are wonderfully tactile, others are meditative and calming, and all provide that satisfying sense of accomplishment that comes from creating something beautiful. Whether you have an afternoon or need a project you can work on over several days, you’ll find something here that fits.
Let’s explore five Mother’s Day gifts seniors can make that prove you don’t need to be “crafty” to make something truly lovely.
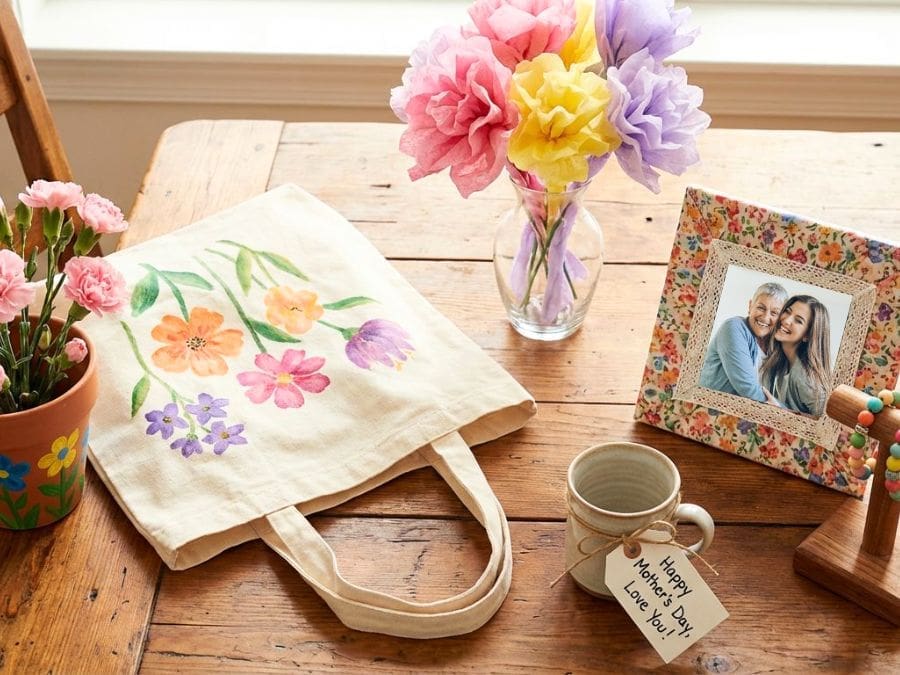
1. Decorated Canvas Tote Bags: Practical Gifts Mum’s Will Use Daily
A personalized tote bag is one of those gifts that combines sentiment with practicality. You can use it for grocery shopping, carrying books, clothing hauls—and every time you use it, you’ll be reminded of the love and creativity that went into making it.
Why This Works So Well
Canvas totes offer a large, flat surface that’s much easier to work with than curved or small items. The fabric is forgiving, if you make a mark you don’t love, you can often incorporate it into the design or paint over it. Unlike paper crafts, tote bags are durable and functional, so your creation will be seen and appreciated regularly rather than stored away.
The process is wonderfully flexible. You can use fabric paint and brushes for traditional painting, stamps for repeated patterns, fabric markers for drawing and writing, or even stencils for precise designs. Each method works beautifully, so you can choose based on what feels comfortable on any given day.
Skill Level & Time
Very beginner-friendly. If you can trace, stamp, or paint simple shapes, you can create a beautiful tote. The project typically takes 1-2 hours, with most of that time spent letting paint dry between layers. Work at your own pace, no rushing needed.
What You’ll Need
Plain canvas tote bag (natural color or white works best), fabric paint or permanent fabric markers, paintbrushes or foam brushes, stencils or stamps (optional), cardboard to place inside the bag while decorating (prevents paint bleeding through), newspaper for workspace protection, and an iron to heat-set the design when finished.
Design Ideas to Try
- Simple Typography: Paint her name, or a favorite saying
- Botanical Prints: Use real leaves as stamps, paint them and press onto fabric
- Handprint Flowers: Turn handprints into tulips or sunflowers with painted stems
- Polka Dot Joy: Use sponges, corks, or bottle caps to stamp perfect circles
- Watercolor Effect: Dilute fabric paint slightly for soft, artistic washes of color
- Child’s Drawing Transfer: Copy a grandchild’s drawing onto the bag with fabric markers
Pro Tips
Always place cardboard inside the bag before decorating to prevent paint from seeping through to the back. Let each color dry completely before adding the next to avoid muddy mixing. Heat-set your design by ironing it (no steam) once fully dry, this makes it washable and durable. If your hand isn’t steady, use stencils or stamps for crisp, professional-looking results.
2. Fabric-Wrapped Picture Frames
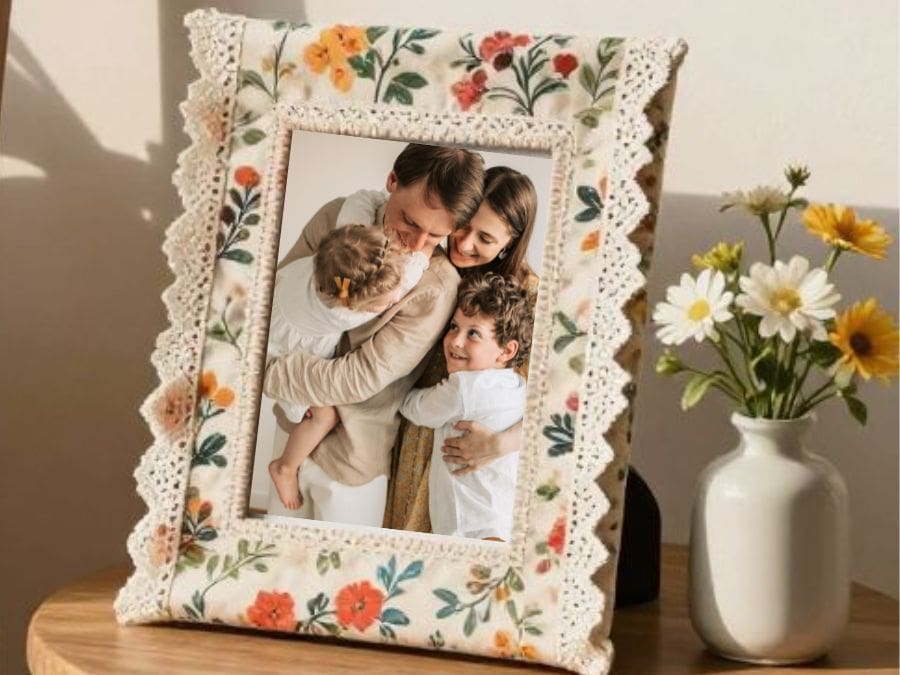
A photograph becomes even more meaningful when displayed in a frame decorated by a person you love. This craft transforms a plain wooden frame into something unique and personal, a perfect showcase for a treasured photo or a special family moment.
Why This Works So Well
Picture frames are wonderfully versatile canvases. You can wrap them with fabric for a soft, quilted look, paint them in any color, embellish them with lace or ribbon, or combine multiple techniques. The frame itself provides structure, so you’re working within defined boundaries, which can feel less overwhelming than a completely blank canvas.
The process is tactile and satisfying, smoothing fabric, arranging decorative elements, seeing the transformation happen. And because frames come in all sizes, you can start small with a 4×6 frame or go larger if you’re feeling ambitious.
Skill Level & Time
Easy to moderate depending on technique. Simple painted frames can be completed in under an hour. Fabric-wrapped or heavily embellished frames might take 2-3 hours. All techniques are approachable for beginners, no special skills required.
What You’ll Need
Plain wooden picture frame (craft stores have inexpensive options), fabric scraps in coordinating colors and patterns, craft glue or Mod Podge, scissors, paintbrushes, ribbon or lace trim (optional), embellishments like buttons or beads (optional), and the perfect photo to place inside.
Design Ideas to Try
- Fabric Patchwork: Cut fabric into squares and decoupage them onto frame in a quilt pattern
- Lace Elegance: Wrap frame in lace or glue lace trim around edges for vintage look
- Painted and Pearls: Paint frame a solid color, add faux pearls in corners
- Nature-Inspired: Press dried flowers or leaves onto frame, seal with Mod Podge
- Button Border: Glue colorful buttons around frame edge in coordinating colors
- Ribbon Wrapped: Wrap entire frame in coordinating ribbon colors, securing with glue
Pro Tips
Remove the glass and backing before decorating to avoid getting glue or paint where you don’t want it. If using fabric, cut pieces slightly larger than needed—you can always trim excess, but you can’t add length. Mod Podge works better than regular glue for fabric because it seals and protects the material. Let everything dry completely (overnight is ideal) before inserting the photo and reassembling the frame.
3. Tissue Paper Flower Bouquets: Blooms That Last Forever
Fresh flowers are lovely but fleeting. These tissue paper blooms offer all the beauty of a bouquet without the wilting, you can display them for months or even years. Making them is surprisingly simple, wonderfully tactile, and the results are genuinely stunning, especially when arranged in a vase with multiple colors.
Why This Works So Well
Tissue paper is delightfully forgiving to work with. It’s soft, easy to fold and cut, and the thinness creates natural dimension and movement in the finished flowers. There’s no precision required, in fact, slightly irregular petals often look more realistic than perfectly uniform ones. The scrunching and shaping motion is satisfying and helps build fine motor skills without feeling like work.
For those who find detailed crafts challenging, tissue paper flowers are ideal. You can’t really mess them up. Too many layers? Looks full and lush. Uneven cuts? Adds character. Petals bent oddly? Part of the organic beauty. The process is forgiving from start to finish.
Skill Level & Time
Beginner-friendly with patience. The technique is simple, fold, cut, gather, fluff, but making a full bouquet takes time, so plan accordingly. The good news is you can build your bouquet gradually.
What You’ll Need
Tissue paper in various colors (at least 4-6 sheets per flower), scissors, pipe cleaners or floral wire, green floral tape (optional, for stems), ribbon for tying bouquet together, and a vase for display. Many craft stores sell tissue paper flower kits with everything included, which can simplify the process.
Design Ideas to Try
- Classic Roses: Red, pink, or white tissue creates romantic, traditional blooms
- Spring Garden Mix: Combine yellows, purples, pinks, and whites for variety
- Elegant White Peonies: Pure white tissue paper makes sophisticated, full flowers
- Rainbow Bouquet: Every color of the rainbow for vibrant, cheerful display
- Ombre Effect: Layer different shades of the same color (light pink to hot pink)
- Two-Tone Flowers: Use two colors in one flower for unique, striped petals
Pro Tips
Stack 6-8 sheets of tissue paper and accordion-fold them together for easier handling. The tighter you gather the center, the fuller your flower will be. Don’t be afraid to really scrunch and separate the layers, this creates dimension and realism. Wrap your bouquet stems together with ribbon and add a handwritten note tied to the ribbon for an extra special touch.
4. Beaded Jewelry: Wearables That They’ll Love To Show Off
There’s something special about jewelry made by hand, especially when those hands belong to someone you love. A beaded bracelet or necklace becomes more than an accessory, it’s a tangible connection, something Mom can wear close to her heart that reminds her of you every single day.
Why This Works So Well
Beading is wonderfully meditative and rhythmic. The process of selecting beads, threading them one by one, and watching your design take shape is calming and satisfying. The beads themselves are lovely to handle, smooth, cool, colorful, providing sensory engagement that many people find soothing.
Word of caution: if doing this with a loved one living with dementia be careful that beads or not accidently ingested.
This craft is also highly adaptable to different ability levels. If fine motor skills are a challenge, use larger beads and thicker cord. If threading is difficult, elastic cord eliminates the need for clasps and closures. And because there’s no painting to dry, no glue to set, once you tie it off, it’s immediately wearable.
Skill Level & Time
Very beginner-friendly. If you can thread beads onto string, you can make jewelry. A simple bracelet takes 20-30 minutes; a necklace might take an hour. There’s no rushing—work at whatever pace feels comfortable, and take breaks whenever you need them.
What You’ll Need
Beads in various colors, sizes, and materials (wooden, glass, ceramic, or acrylic), beading cord or elastic thread, scissors, jewelry findings like clasps and crimp beads (if using non-elastic cord), measuring tape (to size bracelet or necklace), small bowls or containers to organize beads by color, and optional charms or pendants for added interest.
Design Ideas to Try
- Birthstone Bracelet: Use colors representing family members’ birthstones
- Ombre Necklace: Graduate bead colors from light to dark for sophisticated look
- Simple Elegance: Single color of pearls or neutral wooden beads, classic and versatile
- Garden Theme: Alternate green beads with flower-shaped beads for nature lover
- Name or Initial: Use letter beads to spell a name or her initials
- Charm Bracelet: String beads interspersed with meaningful charms
Pro Tips
Measure their wrist or neck before starting, or use yourself as an estimate if its to be a surprise, add an extra inch for comfort. String beads in your desired pattern, then lay it out flat to preview before tying off (it’s easier to rearrange now than later). If using elastic cord, stretch it slightly before tying—this prevents the bracelet from becoming too tight after wear. Tie multiple knots and add a tiny drop of clear glue to secure the knot permanently. For necklaces, consider adding an extender chain so you can adjust the length.
5. Decorated Flower Pots: Garden Gifts With Personal Touch
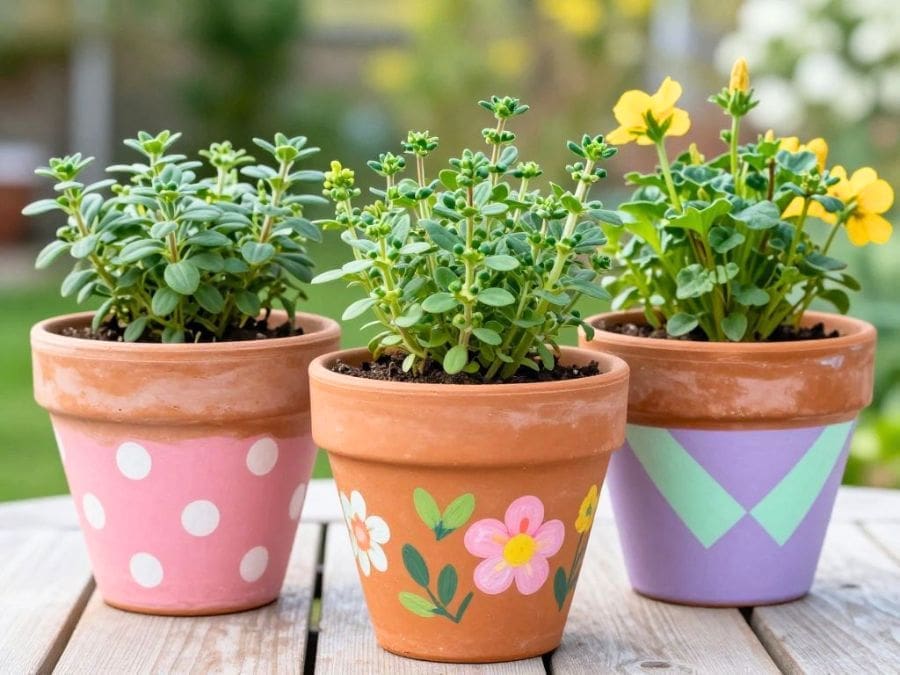
There’s something wonderfully satisfying about transforming a plain terra-cotta pot into something personal and beautiful. This craft combines painting, pattern-making, and the joy of giving something practical that Mums can use immediately, whether filled with her favorite herbs, spring flowers, or a thriving houseplant.
Why This Works So Well
Flower pots are forgiving canvases. The curved surface means paint naturally creates interesting effects, and any “imperfections” just add to the handmade charm. You can go as simple as a single color with her initial, or as detailed as intricate patterns and designs. The clay surface is pleasant to touch, and watching a plain pot transform with each brush stroke is genuinely satisfying.
For those with dementia, the repetitive motion of painting, dipping the brush, applying color, watching it appear, can be calming and meditative. There’s no pressure to create anything specific, yet the end result always looks intentional and lovely.
Skill Level & Time
Beginner-friendly. If you can hold a paintbrush, you can decorate a pot. The entire project takes 1-2 hours plus drying time, though you can spread it over multiple sessions, paint one day, add details another, seal it on a third day.
What You’ll Need
Terra-cotta pots (any size), acrylic paints in their favorite colors, paintbrushes in various sizes, pencil for sketching designs (optional), clear acrylic sealer spray, and newspaper to protect your work surface. Optional embellishments include stencils, sponges for texture, or glitter for sparkle.
Design Ideas to Try
- Classic Floral: Paint simple flowers, leaves, and vines around the rim
- Ombre Effect: Blend colors from light to dark for a modern gradient look
- Polka Dots: Use the eraser end of a pencil or a round sponge for perfect dots
- Geometric Patterns: Triangles, stripes, or chevron designs for contemporary style
- Family Handprints: Each family member adds their handprint in different colors
- Words That Matter: Paint “Love Grows Here,” or their favorite quote
Pro Tips
Prime the pot with a base coat of white or light paint first, this makes your colors more vibrant and easier to see. Work on one side at a time and let it dry before rotating to avoid smudging. If you’re nervous about freehand designs, use painter’s tape to create clean lines or try stencils. Always seal with a clear coat when finished to protect your design from water and weather.
Making It Meaningful: The Heart Behind the Craft
What transforms any of these crafts from simply “nice” to genuinely treasured is the thought and love that went into creating them. They won’t notice if your paint lines aren’t perfectly straight or if your beads aren’t perfectly spaced. They’ll just notice that you took the time, that you thought of her, that you made something with your own hands specifically for her.
If you’re making these crafts with or for someone living with dementia, the process itself is often more valuable than the finished product. The tactile engagement, the color choices, the time spent together, these moments matter. The craft becomes a vehicle for connection, conversation, and shared experience.
Consider including a small note with your gift explaining what you made and why. “I chose purple because it’s your favorite color.” “The flowers remind me of your garden.” These small acknowledgments add another layer of meaning that elevate a handmade gift.
Getting Started: Choose The One You’ll Enjoy Most
You don’t need to make all five of these crafts. Choose the one that sparks your interest, that sounds enjoyable, or that best fits their personality and your abilities. There’s no pressure to be perfectly crafty, the goal is simply to make something with love.
Gather your supplies, set up a comfortable workspace with good lighting, and give yourself permission to enjoy the process without worrying about perfection. Put on some music you love, make a cup of tea, and let the creativity flow. The beauty of handmade gifts is that they’re perfectly imperfect, and that’s exactly what makes them precious.
This Mother’s Day, give something no store can provide: a piece of your heart, your time, and your creativity wrapped up in something beautiful she can use, wear, or display. That’s a gift that truly keeps on giving.
Happy Mother’s Day, and happy crafting!