
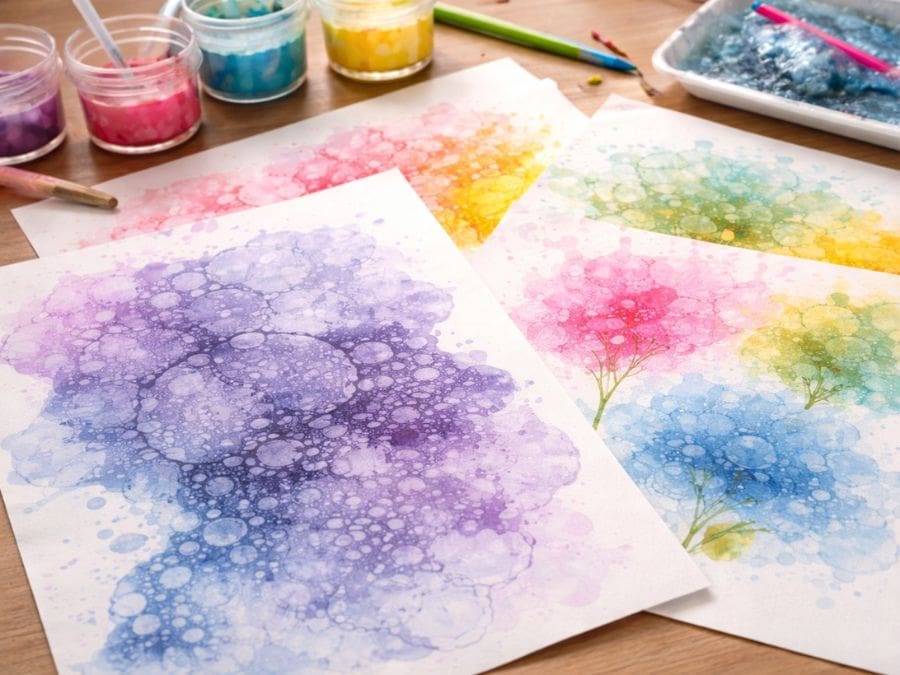
If you’ve been looking for a creative activity that doesn’t require much experience, doesn’t cost a lot, and actually produces something worth keeping, bubble art might be exactly what you need. It’s one of those activities where the process itself is just as enjoyable as the result, and that matters a lot when you’re caring for someone at home.
Here are four bubble art methods, each one using a different technique so there’s something here for everyone, whatever their mobility or concentration level. Some days are better than others, and having a few options up your sleeve means you can match the activity to how your loved one is feeling on the day.
Once you’ve learnt the methods, then checkout this post for ideas on what to make using bubble art, read our companion piece on 10 art ideas to try here
Before we start, a word on preparation. Get everything set up before you sit down together. Then cover the table with an old cloth or newspaper, have a damp cloth nearby for hands, and wear something you don’t mind getting a splashes of colour on. It’s going to get messy!
What You’ll Need
- Washing-up liquid
- Water
- Food colouring or watered-down poster paint
- White card or thick paper (thin paper goes soggy quickly)
- Cups, shallow bowls or trays
- Old towels or newspaper to protect your surface
- A damp cloth for wiping hands
Each method has a few extras listed as we go.
Method 1: Classic Blown Bubble Prints
This is the most well-known version and a lovely place to start. It’s gentle, low-pressure, and even if the bubbles pop before the paper goes down, it still works. The results look beautiful, soft overlapping circles in layers of colour, and people are often genuinely surprised by how lovely they turn out.
What you’ll need:
- A shallow bowl or a cup for each colour
- Washing-up liquid, water, and food colouring or poster paint
- Straws
- Thick paper or card
How to do it:
Mix roughly two tablespoons of washing-up liquid with half a cup of water and a good squeeze of food colouring or a spoonful of paint. Stir gently. You want it well coloured but not too thick or it won’t bubble properly.
Place the straw into the mixture and blow steadily until a mound of bubbles rises above the rim of the bowl. This takes a little practice. If the liquid just blows away rather than foaming up, add a touch more washing-up liquid. Once you have a good pile of bubbles, lay your paper gently on top and press down lightly. Lift it away and you’ll find a beautiful circular pattern transferred onto the page.
Repeat with different colours in different bowls. Overlapping prints in two or three colours gives a really lovely layered effect. Leave the finished piece flat to dry somewhere it won’t be disturbed.
Adapting for dementia or limited mobility:
For someone who finds blowing through a straw difficult, you can do the blowing yourself and simply invite them to press the paper down onto the bubbles. That pressing motion is still very much part of the activity and feels satisfying. Pre-make several bowls of bubbles before you sit down together so there’s no waiting around, which can also help or make it part of the activity depending on your loved one
Use two to three colours rather than five. Choice is good, but too much at once can feel overwhelming. If hand coordination is a challenge, tape the paper to the table so it doesn’t slip. And try pushing the bubbles from off the top of the cup onto the paper rather than having to press paper onto the cup.
Or you can make up cups with no colour, and put mounds of bubbles on the paper for your loved ones to add colour drops to each mound.Work slowly and without rushing to avoid any spillage.
Method 2: Plastic Bottle Bubble Printing
This method is one of my favourites because it produces the most impressive results of all four techniques, big, bold bubble clusters that look almost like cells under a microscope or the inside of a honeycomb. It uses nothing more than an empty plastic bottle, the kind squash or water comes in, and it costs absolutely nothing.
The prints are larger and more dramatic than those made with a straw, and because you’re blowing through the neck of the bottle rather than a thin straw, it’s often easier to control and sustain a good flow of bubbles. It does still require the ability to blow, so keep Method 3 or 4 in mind as an alternative for anyone who finds that difficult.
What you’ll need:
- An empty plastic bottle, a standard 500ml water or squash bottle works well
- Scissors to cut the bottom off
- Washing-up liquid, water, and food colouring or poster paint
- A shallow bowl or tray wide enough to dip the bottle into
- Thick paper or card
How to do it:
Cut the bottom off the plastic bottle cleanly, leaving the neck and opening intact. You want a smooth, even edge at the cut end as this is the part that goes into the mixture, so trim it carefully if needed. This is a job you can do yourself beforehand if you’re worried about sharp edges etc
Mix your bubble solution in the shallow bowl, two tablespoons of washing-up liquid, half a cup of water, and a generous squeeze of food colouring or a spoonful of paint. Stir gently.
Dip the cut end of the bottle into the mixture, just deep enough to coat the open base. Then blow gently and steadily through the neck of the bottle. Bubbles will form at the open base and begin to cluster and grow downward. When you have a good bunch of bubbles, press the paper up against them or lower the bottle down to meet the paper and let the bubbles make contact.
Peel away slowly and you’ll have a cluster of large, clearly defined circles, bolder and more dramatic than anything a straw produces. Repeat in different colours, overlapping clusters for a really striking result.
A tip worth knowing: if you blow too hard the bubbles pop before they reach the paper, so a slow, steady breath works much better than a sharp puff. It takes one or two attempts to get the feel of it, but once you do it’s very easy to repeat.
Because the prints are larger and bolder, this method suits bigger, more graphic images.
Adapting for dementia or limited mobility:
The bottle is easier to grip than a straw for many people, and blowing through a bottle neck feels more natural than blowing through a thin tube. That said, if breath control is limited, you can blow the bubbles yourself and then guide the person’s hand to press the paper gently against them. The pressing is very satisfying with this method because the bubbles are larger and the contact feels more substantial.
Make sure the bottle cut edge is smooth before the session so there are no sharp bits to worry about. If gripping the bottle is difficult, a small elastic band wrapped around the middle gives a little extra grip, or you can hold it steady yourself while they blow through the top.
Method 3: Bubble Wrap Stamping
This one works differently to the first two because there’s no blowing involved at all. Bubble wrap is coated in paint and pressed onto paper, leaving behind a pattern of small circles that looks remarkably like bubble prints. It’s highly accessible, very tactile, and the results can be just as beautiful as the other methods. For anyone with limited breath or hand tremors, this is often the most comfortable option.
It also gives you the most control over where the pattern goes, which means it lends itself well to more planned or detailed pictures.
What you’ll need:
- Bubble wrap, any size bubbles work but larger bubbles give a bolder, more visible print
- Poster paint or thick acrylic paint
- A paintbrush, sponge, or small paint roller
- Thick paper or card
- A tray or plate to put the bubble wrap on while you paint it
How to do it:
Cut a piece of bubble wrap to a manageable size, roughly the size of your hand or slightly larger, with the bubble side facing upward. Using a brush or sponge, coat the bubble side with paint. Don’t overload it, a medium even layer works better than a thick one or the bubbles will fill in and lose their definition.
Press the painted side firmly down onto your paper. Run your hand or a clean roller across the back to make sure all the bubbles make good contact. Then peel it back slowly and see what’s been left behind. The circular pattern is clear and consistent, and it looks genuinely lovely.
You can reuse the same piece of bubble wrap several times before washing it off, and use different sections for different colours. Try pressing the same piece in two colours for a mottled, blended effect.
Because you can place the bubble wrap exactly where you want it, this method is brilliant for building up pictures with intention.
Adapting for dementia or limited mobility:
This is the most physically accessible of the four methods. There’s no blowing, and the pressing motion uses the whole hand rather than fine finger control. You can tape the paper to the table to keep it stable, and the bubble wrap itself is easy to hold and guide.
For someone who finds painting the bubble wrap tricky, you can do that part yourself and hand them the wrap ready to press. The pressing and peeling is often the bit people enjoy most anyway. If someone has very limited movement in their hands, try placing the bubble wrap paint-side down on the paper first and then guiding their hand to press down on top of it together. You’ll probably get that satisfying pop of the bubble wrap if you press to hard!
Use high contrast colours on white paper, strong reds, blues or greens, as this makes the finished print easier to see and more visually rewarding for someone with reduced vision.
Method 4: Whisk or Frother Foam Printing
This method is another wonderful alternative for anyone who can’t blow through a straw, and it gives a completely different result to the first method. Instead of individual bubble prints, you get a more delicate, lacy texture, almost like sea foam or frost on a window. It’s also a bit more of a sensory experience because the foam itself is lovely to look at before you even get the paper involved.
You can use a whisk, a handheld milk frother, or even a fork if that’s what you have. The frother gives the best results but a good hand whisk works perfectly well.
What you’ll need:
- A bowl for each colour
- Washing-up liquid, water, and food colouring or paint
- A hand whisk, electric frother, or fork
- Thick paper or card
How to do it:
Mix two tablespoons of washing-up liquid with half a cup of water and your chosen colour, the same basic mixture as Method 1. Then whisk it vigorously until you have a big, airy foam sitting on top of the liquid. An electric frother gets you there in about twenty seconds. A hand whisk takes a minute or two but is perfectly effective.
Once you have a generous layer of foam, lay your paper on top and press down gently with your whole hand. Hold it there for a few seconds, then peel it back slowly. The pattern left behind is more delicate and detailed than blown bubble prints, with a beautiful frothy texture.
You can also spoon the foam directly onto the paper and spread it around before pressing a second sheet on top to make two prints at once.
Adapting for dementia or limited mobility:
This is a gentler method in terms of physical effort. The whisking can be done together, with you doing the harder work and the person you’re caring for giving it a few turns if they’d like to. The pressing down onto the foam is a simple, satisfying movement that doesn’t require much dexterity.
If someone is sensitive to textures, let them watch first and see if they’d like to touch the foam before committing. Some people love the sensation, others prefer to just do the pressing with the paper. Both are fine. Keep the bowl close and stable so they don’t have to reach awkwardly, and have a spare sheet of paper ready so there’s no pressure to get it right first time.
A Few Things Worth Knowing
Two or three colours is almost always better than five or six. The prints look cleaner, and it’s less overwhelming to choose from a smaller selection. Colours that sit next to each other on the colour wheel, blues and greens, reds and oranges, yellows and greens, tend to blend beautifully when they overlap. Colours opposite each other, like red and green or blue and orange, give a bolder, more striking contrast.
Don’t worry about the end result. Some sessions produce pieces worth framing. Others produce a cheerful mess and a bit of a laugh, and that’s equally a good afternoon. The doing is the point, not the finishing.
If you’re looking for ideas on what to make using bubble art, then check out our companion piece on 10 art ideas to try here
Let the prints dry completely before handling them. Once they’re dry, bubble art pieces make lovely handmade cards, gift wrap, bookmarks, or just something to put on the wall.